[Home](../) › [Blog](../blog) › 4 Ways to Implement ICommand
# 4 Ways to Implement ICommand
> Explore various methods to implement the ICommand interface efficiently with minimal manual coding.
Published: 2024-11-06 · Author: Metalama Team · Canonical: https://postsharp.net/blog/wpf-command
One of the best practices in WPF is to implement the logic behind buttons and menu items as a _command_ instead of a simple event handler. In this article, we review several ways to implement a WPF command, focusing on strategies that minimize the amount of boilerplate code.
## What is the ICommand interface?
`ICommand` is an interface used to define commands in the context of .NET, particularly for the command pattern, which is a behavioral design pattern widely used in the **Model-View-ViewModel (MVVM)** architectural pattern. Commands are a way to bind UI user actions, such as button clicks, to methods in your view model.
The `ICommand` interface is part of the `System.Windows.Input` namespace and typically includes two primary methods and one event:
1. **Execute(Object parameter)**: This method defines the action that will be taken when the command is invoked. It takes an object parameter, which can be used to pass data from the caller to the command logic.
2. **CanExecute(Object parameter)**: This method determines whether the command can execute in its current state. It also takes an object parameter and returns a boolean value. If it returns `false`, it indicates that the command should be disabled in the UI.
3. **CanExecuteChanged**: This event occurs when changes occur that affect whether or not the command should execute. The UI elements bound to this command will typically listen for this event to enable or disable themselves accordingly.
```csharp
public interface ICommand
{
bool CanExecute (object? parameter);
void Execute (object? parameter);
event EventHandler? CanExecuteChanged;
}
```
You can read more about the `ICommand` interface in the [official Microsoft documentation](https://learn.microsoft.com/en-us/dotnet/api/system.windows.input.icommand?view=net-8.0).
## Why use ICommand?
The `ICommand` interface is essential in maintaining a clear separation between command logic and the user interface elements that trigger these commands. This separation follows the design principle of [separation of concerns](https://en.wikipedia.org/wiki/Separation_of_concerns), enhancing maintainability, reusability, and, most importantly, testability.
Isolating command logic from UI components allows you to:
- Ensure that the application's functionality remains independent of its visual representation.
- Conduct unit tests on your application's logic without impacting the user interface.
- Encourage a cleaner and more modular architecture, making it easier to adapt and extend the application over time.
## How to use ICommand from WPF?
In WPF applications, the `ICommand` interface is commonly used to bind user actions to command logic in the view model. This binding is typically done in the XAML file using the `Command` attribute of UI elements such as buttons, checkboxes, and menu items. When the button is clicked, the command's `Execute` method is called, executing the associated logic. The button also uses the `CanExecute` method to determine if it should be displayed as enabled or disabled.
This is how you bind a button to a command in WPF:
```xml
```
And this is how you would define the `MyCommand` property in your view model.
```csharp
public ICommand MyCommand { get; }
```
The `MyCommand` property should be initialized with an instance of a class that implements the `ICommand` interface, such as `MyCommandImplementation`. This class would contain the logic to be executed when the command is invoked.
```csharp
public MyControl()
{
this.MyCommand = new MyCommandImplementation( this );
}
```
Let's now see how we can implement `MyCommandImplementation`.
## How to implement ICommand?
There are basically four ways to implement the `ICommand` interface:
1. [Manually](#scenario1), writing all the code yourself. It's good to do it at least once to understand how things work, but it requires a lot of code.
2. [Using Metalama's Command aspect](#scenario2), which automatically generates all boilerplate code for you on the fly.
3. [Using CommunityToolkit.Mvvm's RelayCommand source generator](#scenario3), similar to Metalama, but does not trigger the `CanExecuteChanged` event for you.
4. [Using the ReactiveObject class from the ReactiveUI package](#scenario4), an alternative solution that does not rely on source generation.
### Our demo app
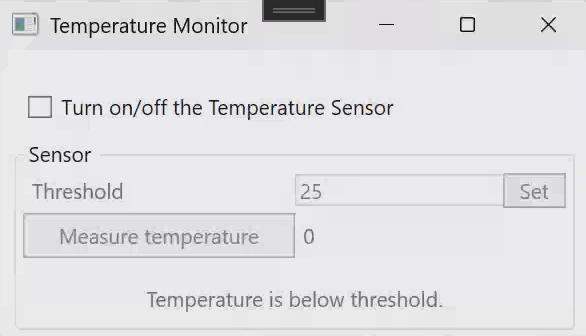
To illustrate these approaches, we will use the same simple demo app, implemented four times.
It is a basic temperature monitoring application. It asks the user to establish a threshold and retrieve the temperature from the sensor to determine if it exceeds the set limit.
This small WPF application has three different commands of varying complexity:
- A command to toggle the temperature sensor on or off.
- A command to set the sensor's threshold temperature.
- A command to obtain the current temperature from the sensor.
## 1. Implementing the ICommand interface manually
The most basic way to implement the `ICommand` interface is to create a custom class that implements the interface's methods and event. This approach requires you to define the logic for the `Execute` and `CanExecute` methods, as well as the `CanExecuteChanged` event inside that class.
### Parameterless commands
Let's begin with a parameterless command that will execute some action when called. As an example, we have the command that toggles the temperature sensor on or off we mentioned earlier.
To implement this command, we create a class called `ToggleTemperatureSensorCommand` that implements the `ICommand` interface.
```csharp
internal sealed class ToggleTemperatureSensorCommand : ICommand
{
private readonly TemperatureSensor _sensor;
public ToggleTemperatureSensorCommand( TemperatureSensor sensor )
{
this._sensor = sensor;
}
public event EventHandler? CanExecuteChanged;
public bool CanExecute( object? parameter )
{
return true;
}
public void Execute( object? parameter )
{
this._sensor.IsEnabled = !this._sensor.IsEnabled;
}
}
```
The full source code of examples in this article is available on [GitHub](https://github.com/postsharp/TimelessDotNetEngineer/tree/main/src/wpf/icommand).
As you may infer from the code snippet above, this command class has the necessary logic for toggling the temperature sensor on or off. The `Execute` method simply toggles the `IsEnabled` property (ignoring the `object? parameter`), while the `CanExecute` method always returns `true`, indicating that the command can be executed at any time.
To use this command in your view model, you would typically create an instance of the `ToggleTemperatureSensorCommand` class and bind it to a UI element in your XAML file. So, for our example application, we create a property for the command in the `TemperatureViewModel` class and initialize it in the constructor.
Here is the property definition:
```csharp
public ICommand ToggleTemperatureSensorCommand { get; }
```
And here is the initialization line inside the constructor:
```csharp
this.ToggleTemperatureSensorCommand = new ToggleTemperatureSensorCommand( this.Sensor );
```
Remember that the whole point of a command is to be bound to a UI element, so to complete our example, we need to bind the command to the checkbox that will toggle the sensor on or off. Here is the XAML code snippet:
```xml
```
Each time the user clicks the checkbox, the `Execute` method of the `ToggleTemperatureSensorCommand` will be called, toggling the sensor on or off.
### Command with a parameter
Now, let's consider a more complex command that requires a parameter. In our example application, we have a command that sets the threshold temperature for the sensor. This command takes a double as a parameter that represents the new threshold value, which will be used to determine if the temperature exceeds the set limit.
As you may remember, we said before that the `Execute` method of the `ICommand` interface receives an `object` parameter. This parameter can be used to pass data from the UI element to the command logic. In the case of the `SetThresholdTemperatureCommand`, we will pass the new threshold value as that parameter.
How to do it? If the `Set` button is responsible for calling the command (through the `Command` attribute), then we will use the `CommandParameter` attribute to pass the new value of the threshold to the command. Here is the XAML code snippet for the `Set` button:
```xml
```
In this case, the Threshold text box is linked to the `Threshold` property within the view model. So, when the user enters a new value in the text box, the `Threshold` property is updated. Then, when the user presses the `Set` button, the value of the `Threshold` property is passed as a parameter to the `SetThresholdCommand`.
```csharp
public void Execute( object? parameter )
{
this._sensor.Threshold = Convert.ToDouble( parameter!, CultureInfo.CurrentCulture );
}
```
Using this approach allows you to create custom commands tailored to your application's specific requirements, sending parameters to the command logic as needed.
Manually implementing the `ICommand` interface can be cumbersome and error-prone, especially when dealing with multiple commands or complex logic. But if that wasn't enough, we've saved the most cumbersome part for last.
Remember we said that commands should be bound to UI elements? Well, to keep the UI up to date, you should use the `INotifyPropertyChanged`, implementing it at least in your view model (or in other classes like our `TemperatureSensor`) and triggering the corresponding `PropertyChanged` event every time the command changes some state.
Back to our example, the `TemperatureViewModel` class implements the `INotifyPropertyChanged` interface. As we saw in our parameterless example above, when the user toggles the checkbox to activate the sensor, the `ToggleTemperatureSensorCommand` changes the sensor's `IsEnabled` property value. However, the GroupBox that allows user interaction with the sensor remains unaware of this change because it's linked to the `IsSensorEnabled` property of the `TemperatureViewModel` class.
```xml
```
Besides the fact that this property is directly related to the `Sensor` instance (which was updated by the `ToggleTemperatureSensorCommand`), no one informed the UI of the need to read back that value. To achieve this, we must subscribe to the sensor's `PropertyChanged` event (added by the implementation of the `INotifyPropertyChanged` interface) and manually trigger the `OnPropertyChanged` of the `TemperatureViewModel` class.
```csharp
public TemperatureSensor Sensor
{
get => this._sensor;
set
{
if ( !ReferenceEquals( value, this._sensor ) )
{
this.UnsubscribeFromSensor();
this._sensor = value;
this.OnPropertyChanged( nameof(this.Sensor) );
this.SubscribeToSensor();
}
}
}
public bool IsSensorEnabled => this.Sensor.IsEnabled;
```
You can see the `HandleSensorPropertyChanged` method that triggers the `OnPropertyChanged` according to the property that has changed. Note that triggering is done manually.
```csharp
private void SubscribeToSensor()
{
if ( this._sensor != null )
{
this._sensor.PropertyChanged += this.HandleSensorPropertyChanged;
}
}
private void HandleSensorPropertyChanged( object? sender, PropertyChangedEventArgs e )
{
{
var propertyName = e.PropertyName;
if ( propertyName is nameof(this.Sensor.IsEnabled) )
{
this.OnPropertyChanged( nameof(this.IsSensorEnabled) );
}
if ( propertyName is nameof(this.Sensor.Temperature) or nameof(this.Sensor.Threshold) )
{
this.OnPropertyChanged( nameof(this.CurrentTemperature) );
this.OnPropertyChanged( nameof(this.TemperatureStatus) );
}
}
}
```
That's a lot of additional boilerplate code! In such cases, alternative approaches can simplify the process and reduce the amount of boilerplate code required.
## 2. Use Metalama's Command aspect
As stated in the previous section, there are alternative ways to implement the `ICommand` interface than manually creating custom classes for each command. [Metalama](https://www.postsharp.net/metalama) is a tool that allows you to automate repetitive tasks in your codebase using aspects, special custom attributes that execute within the compiler or the IDE and dynamically transform your source code. Metalama has a lightweight implementation of the `ICommand` class named `[Command]` that simplifies the creation of commands in your WPF applications.
To use the `[Command]` class, you need to:
1. Add the `Metalama.Patterns.WPF` package to your project.
2. Create a new method in your view model that will contain the logic for the command. The method should have a `void` return type.
3. Apply the `[Command]` aspect to the command method you just created.
As an end note, make sure the class is `partial` to enable referencing the generated command properties from C# or WPF source code.
### Parameterless command
Here is the same example we implemented manually before (the `ToggleTemperatureSensorCommand`) but now using the `[Command]` class.
```csharp
[Command]
public void ToggleTemperatureSensor()
{
this.Sensor.IsEnabled = !this.Sensor.IsEnabled;
}
```
As you can see, we just moved the `Execute` implementation from the `ToggleTemperatureSensorCommand` class we had before to the `ToggleTemperatureSensor` method in the `TemperatureViewModel` class.
When the `[Command]` attribute is applied to a method, the aspect automatically generates a property following this pattern: method name plus the *Command* word; that's why we are talking about the `ToggleTemperatureSensorCommand`. In this case, the `CanExecute` method is not necessary since the command is always enabled.
### Command with a parameter
Now, let's see how the `SetThresholdTemperatureCommand` can be implemented using the `[Command]` class.
```csharp
[Command]
public void SetThreshold( double threshold )
{
this.Sensor.Threshold = threshold;
}
```
In this case, the `SetThresholdTemperature` method receives a `double` parameter representing the new threshold value. This parameter is passed from the UI as we saw in the previous section. The `[Command]` aspect is applied to the method, which automatically generates the command that will be bound to the UI element.
### Support for CanExecute
The `[Command]` class can also generate the `CanExecute` method, although it is not implemented by default. The easiest way is to define a `CanExecuteFoo` property in your code, where `Foo` is the name of your command.
The following snippet shows the `MeasureTemperature` method with the attribute `[Command]`, which will generate the `MeasureTemperatureCommand` to measure the temperature using the sensor. It also creates the `CanExecute` method using the `CanMeasureTemperature` implementation (following the first convention stated above). The latter will be responsible for enabling or disabling the button based on the sensor's state to prevent repeated requests to the sensor.
```csharp
[Command]
public void MeasureTemperature()
{
this.Sensor.Temperature = this.Sensor.MeasureTemperature();
}
public bool CanMeasureTemperature => this.Sensor is { IsEnabled: true, IsMeasuring: false };
```
Whenever the `CanMeasureTemperature` property changes its value, the `ICommand.CanExecuteChanged` event will be raised, so UI components bound to the command can update their state accordingly. Why? Because Metalama covered that for you too.
When the declaring type implements the `INotifyPropertyChanged` interface (e.g., our `TemperatureViewModel`), the `ICommand.CanExecuteChanged` event will be raised whenever the `CanExecute` property changes. You can even use the `[Observable]` attribute (another [Metalama production-ready aspect](https://www.postsharp.net/metalama/marketplace)) to implement `INotifyPropertyChanged` [reducing even more the boilerplate code](https://postsharp.net/blog/inotifypropertychanged-metalama).
## 3. Use CommunityToolkit.Mvvm's RelayCommand source generator
Another approach to the automatic implementation of the `ICommand` interface is to use the `[RelayCommand]` attribute from the `Microsoft.Toolkit.Mvvm` package. Similarly to Metalama, this attribute triggers a _source generator_ that generates the boilerplate code for you.
To use the `[RelayCommand]` attribute and its source generator, you need to:
1. Add the `Microsoft.Toolkit.Mvvm` package to your project.
2. Create a new method in your view model that will contain the logic for the command.
3. Apply the `[RelayCommand]` attribute to the command method you just created.
```csharp
[RelayCommand]
public void ToggleTemperatureSensor()
{
this.Sensor.IsEnabled = !this.Sensor.IsEnabled;
}
[RelayCommand]
public void SetThreshold( double threshold )
{
this.Sensor.Threshold = threshold;
}
```
As you can see, the process is similar to using the `[Command]` class from Metalama. You create a method in your view model, apply the `[RelayCommand]` attribute to it, and the command is automatically generated.
However, the `[RelayCommand]` does not follow any convention for the `CanExecute` generation and asks you to:
- create a separate method that returns a boolean value indicating whether the command can be executed (as with Metalama)
- use the `CanExecute` property of the `RelayCommand` class to indicate the target property or method to use.
Here is an example of how to implement the `CanExecute` method for the `MeasureTemperature` command:
```csharp
[RelayCommand( CanExecute = nameof(CanMeasureTemperature) )]
public async Task MeasureTemperature()
{
this.Sensor.Temperature = await this.Sensor.MeasureTemperature();
}
private bool CanMeasureTemperature => this.Sensor is { IsEnabled: true, IsMeasuring: false };
```
And how to handle `INotifyPropertyChanged` and notify the UI about changes in the `CanExecute` method?
Well, the `[RelayCommand]` has a `NotifyCanExecuteChanged` method that you can call whenever the `CanExecute` method changes its return value. This method raises the `CanExecuteChanged` event of the command, which notifies the bound UI elements that the command's state has changed.
To do that in our example, we used the `OnSensorChanged` method to subscribe to the `PropertyChanged` event of the `Sensor` object.
```csharp
partial void OnSensorChanged( TemperatureSensor sensor )
{
this.SubscribeToSensor( sensor );
}
```
Then we call the `NotifyCanExecuteChanged` method whenever the `IsEnabled` property changes.
```csharp
private void SubscribeToSensor( TemperatureSensor? value )
{
if ( value != null )
{
value.PropertyChanged += this.HandleSensorPropertyChanged;
}
}
private void HandleSensorPropertyChanged( object? sender, PropertyChangedEventArgs e )
{
{
var propertyName = e.PropertyName;
if ( propertyName is nameof(this.Sensor.IsEnabled) )
{
this.OnPropertyChanged( nameof(this.IsSensorEnabled) );
this.MeasureTemperatureCommand.NotifyCanExecuteChanged();
}
if ( propertyName is nameof(this.Sensor.Temperature) or nameof(this.Sensor.Threshold) )
{
this.OnPropertyChanged( nameof(this.CurrentTemperature) );
this.OnPropertyChanged( nameof(this.TemperatureStatus) );
}
}
}
```
Despite the need for more boilerplate code, the `[RelayCommand]` class is a good alternative to simplify the implementation of the `ICommand` interface in your WPF applications.
## 4. Use ReactiveUI's ReactiveObject
The last alternative we will explore is using the `ReactiveObject` class from the `ReactiveUI` package. [`ReactiveUI`](https://www.reactiveui.net/) is a powerful MVVM framework that provides a set of tools and utilities to simplify the development of reactive applications. The `ReactiveObject` class is a base class that implements the `INotifyPropertyChanged` interface and provides a way to create reactive properties and commands in your view models.
To use the `ReactiveObject` class, you need to:
1. Add the `ReactiveUI.WPF` package to your project.
2. Define a property of type `ReactiveCommand` in your view model.
3. Create a new instance of the `ReactiveCommand` class and pass the command logic to its constructor.
### Parameterless Command
For the `ToggleTemperatureSensorCommand` in our example application, we create a property for the command in the `TemperatureViewModel` class and initialize it in the constructor.
Here is the property definition:
```csharp
public ReactiveCommand ToggleTemperatureSensorCommand { get; }
```
And here is the initialization line inside the constructor:
```csharp
this.ToggleTemperatureSensorCommand = ReactiveCommand.Create(
() =>
{
this.Sensor.IsEnabled = !this.Sensor.IsEnabled;
} );
this.Sensor.WhenAnyValue( s => s.IsEnabled )
.Subscribe( _ => this.RaisePropertyChanged( nameof(this.IsSensorEnabled) ) );
```
What about that last line? The `ReactiveCommand` class doesn't have a `CanExecute` method like the `[RelayCommand]` class. Instead, you can use the `WhenAnyValue` method from the `ReactiveUI` package to create a reactive property that depends on the `IsEnabled` property of the `Sensor` object. This way, the `IsSensorEnabled` property will be updated whenever the `IsEnabled` property of the `Sensor` object changes, and the UI elements bound to the `ToggleTemperatureSensorCommand` command will be updated accordingly.
### Command with Parameter
Now, let's see how the `SetThresholdTemperatureCommand` can be implemented using the `ReactiveCommand` class.
Again, we start by creating a property for the command in the `TemperatureViewModel` class.
```csharp
public ReactiveCommand SetThresholdCommand { get; }
```
And then we initialize it in the constructor.
```csharp
this.SetThresholdCommand = ReactiveCommand.Create(
( double parameter ) =>
{
this.Sensor.Threshold = Convert.ToDouble( parameter );
} );
this.Sensor.WhenAnyValue( s => s.Threshold )
.Subscribe(
_ =>
{
this.RaisePropertyChanged( nameof(this.TemperatureStatus) );
this.RaisePropertyChanged( nameof(this.CurrentTemperature) );
} );
```
In this case, the `ReactiveCommand` class has a `Create` method that takes a lambda expression as a parameter. This lambda expression represents the command logic, which in this case sets the `Threshold` property of the `Sensor` object to the value passed as a parameter.
This last alternative is a great choice if you are already using the `ReactiveUI` framework in your WPF application, as it provides a seamless way to create reactive properties and commands in your view models. However, it may be overkill if you are not using the framework already.
## Comparison
As a summary, let's compare the different alternatives we went through in this article:
| Criteria | Metalama | MVVM Community Toolkit | ReactiveUI |
| ------------------------------------------------- | --------------- | ---------------------- | ---------- |
| Approach | Code generation | Code generation | Delegates |
| Execute method support | Supported | Supported | N/A |
| CanExecute method support | Supported | Supported | N/A |
| CanExecute method through naming conventions | Supported | Not supported | N/A |
| CanExecute integrated with INotifyPropertyChanged | Supported | Not supported | N/A |
| Debug Generated Code | Supported | Supported | N/A |
## Conclusion
The `ICommand` interface is crucial in the MVVM pattern for WPF applications, as it helps separate UI components from their underlying logic, improving maintainability and testability. While manually implementing `ICommand` can be simple for basic scenarios, it becomes complex and error-prone with more intricate cases. Tools like Metalama `[Command]` aspect, CommunityToolkit.Mvvm's `[RelayCommand]`, and ReactiveUI's `ReactiveObject` offer more efficient alternatives by automating repetitive code, allowing developers to focus on business logic.
Metalama provides seamless command generation and `CanExecute` logic through intuitive naming conventions, while CommunityToolkit.Mvvm's RelayCommand offers similar benefits with a different approach to conditional execution logic. The Metalama alternative is less cumbersome when used alongside the `[Observable]` aspect to implement the `INotifyPropertyChanged`. ReactiveUI's `ReactiveObject` class may be a better choice for developers already using the ReactiveUI framework.
All of these tools reduce development time and complexity while maintaining flexibility in design. The choice between them depends on the needs of the project and the developer's preferences, but they all improve productivity and ensure a robust application architecture for commands in WPF applications.
---
## Site navigation
- Index of the whole site: [llms.txt](../llms.txt)